
Key Takeaways
- 1Run DDU from Safe Mode before anything else, extracted to C:/DDU/ rather than a user folder, since a user folder can stop it loading in Safe Mode where the whole process needs it to work.
- 2Download the Game Ready Driver from nvidia.com before you run DDU. Once DDU wipes the old driver you’re left on the Microsoft Basic Display Adapter, and downloading anything on that is a chore you don’t need.
- 3A clean install either fixes the fault outright or proves it’s hardware; either answer is useful, and it only takes about 20 minutes to get one.
- 4Pick Game Ready over Studio or Pro for gaming every time. Both of the other branches update less often and can look current on version number alone while missing fixes Game Ready already has.
- 5Set image sharpening to 0.50 with 0.17 film grain as a starting point; it costs nothing in frame rate, but push it too far past that and detail starts dissolving instead of sharpening.
- 6Turn Low Latency Mode On. It lowers input latency and raises frame rates at the same time, which is a rare enough combination that there’s no real case for leaving it Off.
- 7Turn DSR Factors and DSR Smoothness Off. Digital Trends calls DSR a killer for frame rates, and DLSS already does the same sharpening job without the penalty.
- 8G-Sync’s own guide splits on this: turn it on without hesitation on an older or mid-range setup, but on a powerful card paired with a high-refresh monitor it can cost you performance instead of adding any.
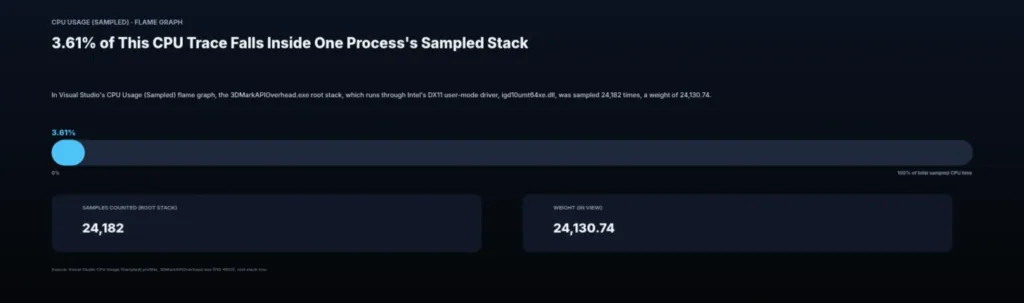
- 9Check your CPU before blaming the Arc B580: paired with a Ryzen 7 9800X3D it trades blows with the RTX 4060, but on an Intel Core i5-9600K it falls well behind that same card, with Intel’s driver burning nearly 5 times more CPU time processing draw calls than AMD’s in one test.
Getting the Driver and DDU Ready
Ticking the clean install box inside Nvidia’s own installer feels like it should do the job, and it does something, just not enough. A clean reinstall exists to separate a software problem from a hardware one by clearing out every leftover driver file and setting, because those leftovers are frequently the actual fault rather than an innocent bystander. Nvidia’s checkbox doesn’t reach as deep as a dedicated tool does, which is why Display Driver Uninstaller, built by Wagnardsoft, is the one NZXT support recommends for exactly this job.
Download DDU and Extract It Correctly
Pull DDU from the official Wagnardsoft site or the Guru3D official mirror, not some random reupload floating around a forum. Extract it to the root of C:, something like C:\DDU\, rather than Desktop, Documents or any folder tucked inside your user account. That folder choice isn’t cosmetic. A user folder can stop DDU loading properly once you’re in Safe Mode, and Safe Mode is the one environment this whole process needs it to work in.
The Folder Trap
If DDU looks broken or won’t load once you’ve booted into Safe Mode, check where you extracted it first. Running it from Desktop or Documents is the common culprit. Extracting straight to the root of C: avoids the problem entirely, and since Safe Mode is the one environment DDU absolutely has to work in, this isn’t a step worth skipping.
Grab the New Driver Before You Uninstall Anything
Download the Game Ready Driver from nvidia.com before you touch DDU. Order matters here: once DDU has done its work, the machine is left running on a basic display driver, and trying to download anything on that is an exercise in patience you don’t need to sign up for.
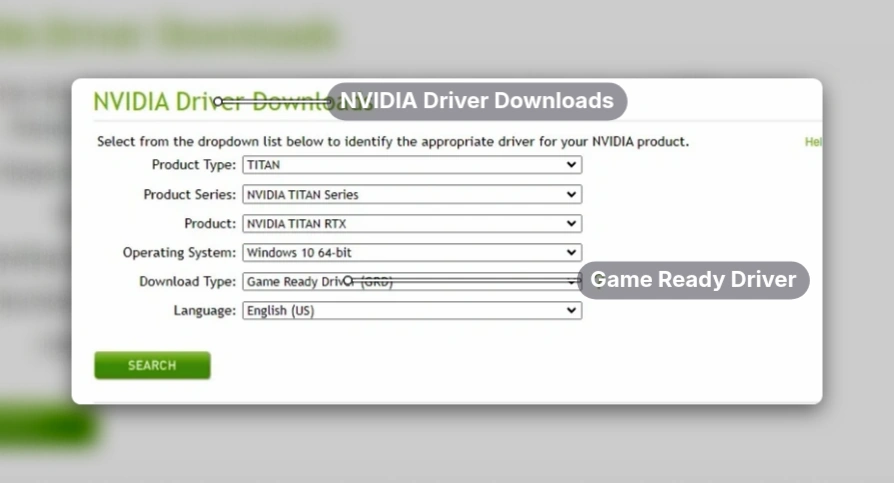
- DDU extracted to C:\DDU\, not a user folder
- The latest Game Ready Driver already saved from nvidia.com
- DDU itself pulled from the official site or the Guru3D mirror
- The whole process, start to finish, runs about 20 minutes
Safe Mode and the DDU Run
Normal Windows keeps the driver’s files locked up and running, which is exactly why DDU can’t touch all of them without a detour into Safe Mode first. Files that are in use can’t all be deleted while they’re in use, so some of them survive the wipe and you’re left with a clean install that isn’t actually clean. NZXT strongly recommends running the removal from Safe Mode for this reason, and skipping it undoes the whole point of pulling DDU out in the first place.
Trigger a recovery restart
Open the Start menu, hold down Shift, then click Power followed by Restart. Keep Shift held through both clicks and only let go once the restart has started.
Work through the recovery menus
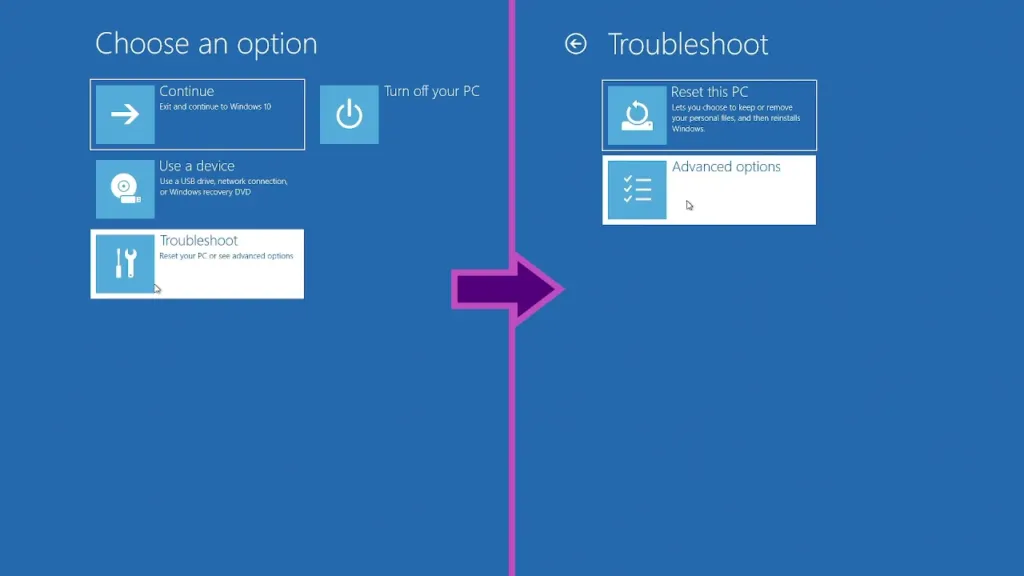
On the Choose an option screen, click Troubleshoot, then Advanced options, then Startup Settings, then Restart. Each click leads into the next menu, four in total, ending with another restart.
Pick a Safe Mode option
The machine comes back to a blue screen with a numbered list of startup options. Press 4 for plain Safe Mode, or press 5 for Safe Mode with Networking if you need internet access from inside it. Either one gets DDU running cleanly.
Confirming you’re actually in Safe Mode
The desktop background turns black and the words Safe Mode appear in all four corners of the screen. If you don’t see that, you’ve booted into a normal session by mistake, and running DDU here won’t give you the clean wipe you’re after.
Open DDU from the Start menu or from wherever its folder lives. The first time it runs, it throws up a couple of warnings and an options window, and none of that needs touching. The defaults are already set up correctly, so just click Close and move on to the actual removal.
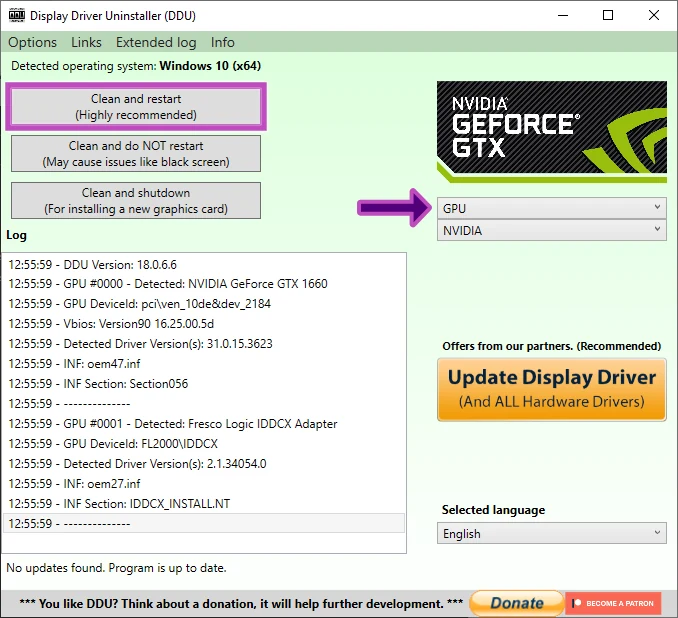
- Set Device Type to GPU
- Set Select Device to your GPU’s brand, though DDU usually picks this up on its own
- Click Clean and restart, the option DDU itself labels as highly recommended
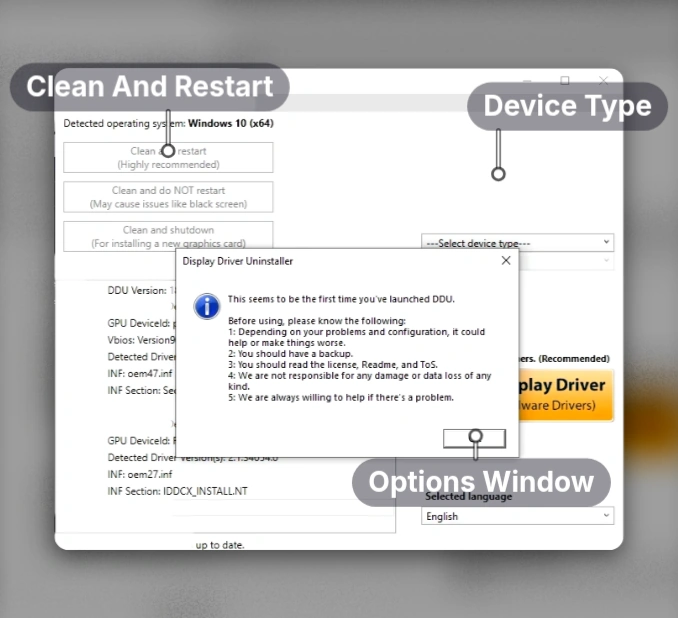
Clean and restart takes roughly 3 to 5 minutes to run. When it’s done, DDU restarts the machine on its own, so there’s nothing left for you to click or trigger yourself, just wait it out.
The desktop that greets you after DDU’s reboot looks like a problem: the resolution has dropped, the icons are huge, and if you’re running 2 or 3 monitors only one of them is even lit up. It isn’t a problem. Windows has fallen back to the Microsoft Basic Display Adapter because the GPU driver that used to talk to those screens is gone, and NZXT is clear that this state is normal and temporary. It’s the expected middle step between wiping the old driver and installing the new one, not a sign DDU broke something.
Run the installer and accept the extraction path
Double-click the NVIDIA driver file you downloaded and the first thing it asks is where to extract its files. That reads like an install location question and it isn’t one; it’s a temporary unpack folder the installer deletes when it’s done. NZXT says the default path is fine, so click OK and move on.
Choose whether to bundle GeForce Experience
Next the installer asks if you want the graphics driver on its own or paired with GeForce Experience. GeForce Experience is the piece that nags you about future updates and tunes in-game settings for you, and NZXT is blunt that the GPU runs fine without it. Digital Trends calls the NVIDIA app that replaced it optional but useful, which is really the same answer from a different angle. Pick either and click Agree and Continue.
Pick Express, not Custom
At the installation type prompt, choose Express. There’s nothing left on this machine worth preserving after a DDU wipe, so there’s no reason to pick through components by hand. Custom exists for someone deliberately leaving a specific piece out, and that isn’t you right now. Restart if the installer asks for one.
Open Device Manager and check Display Adapters
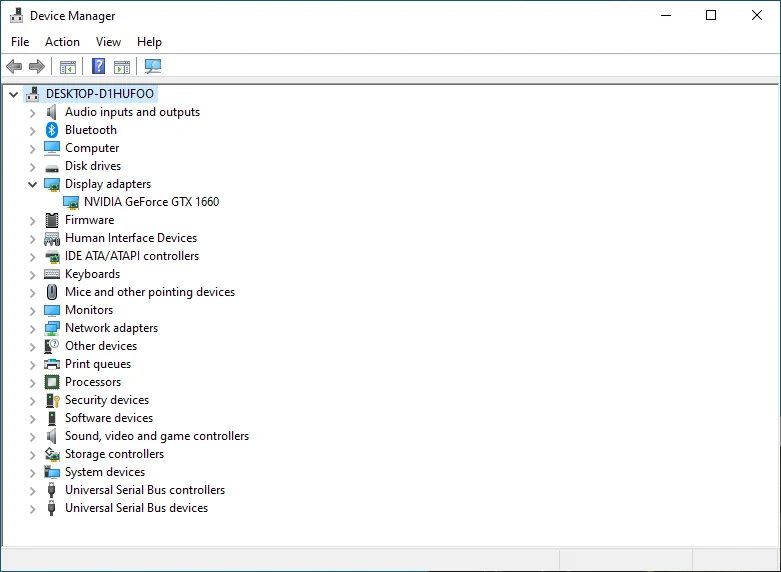
Right-click the Start menu, choose Device Manager, and expand the Display Adapters entry. This is the one check that actually proves anything: either your GPU’s full model name is sitting there, or it isn’t. The screenshot shows what the pass looks like, the card listed in full under Display Adapters.
If the full model name is there, you’re done. The resolution snaps back to normal and any extra monitors you had running wake back up, which is the visible proof that the install actually took, not just the Device Manager entry. If Microsoft Basic Display Adapter is still sitting in that list instead, the driver didn’t land and step 4 needs running again before you trust anything else on the machine.
Code 43 After a Clean Install Means Hardware, Not Software
If Device Manager throws Code 43 after a full DDU wipe and a fresh install, that isn’t a dead end, it’s useful information. A clean install wipes out driver corruption as a possible cause entirely, so Code 43 showing up anyway points straight at the card itself. NZXT has a separate guide built specifically for a GPU that isn’t being detected, and that’s the one to open next, not another reinstall of the same driver.
Game Ready, Studio and Pro: pick the right branch
NVIDIA ships three driver branches for the 3060 Ti, and gaming only has one correct answer: Game Ready. Studio and Pro exist for a different job entirely, built around stability for content creation and workstation workloads rather than frame rates, and that priority shows up in how often NVIDIA updates them. Both branches ship less frequently than Game Ready, which means a Studio or Pro package can sit well behind on support for new games even while it looks like the current driver on the download page. For gaming, Game Ready is the only pick worth making.
| Branch | Built for | Update cadence |
|---|---|---|
| NVIDIA Game Ready | Gaming performance | Latest driver, updated most often |
| NVIDIA Studio / Pro | Content creation and workstation stability | Updates less often, can lag on game support |
The same branch question comes up if you’re switching cards rather than sticking with NVIDIA. AMD Radeon owners want AMD Software Adrenalin Edition marked WHQL Recommended, and Intel Arc owners want the WHQL certified Game On driver from intel.com. Whichever of the three you need, NZXT’s advice holds regardless of vendor: download the new driver before you uninstall anything, so you’re not left staring at a wiped system with nothing to reinstall.
- NVIDIA: the latest Game Ready Driver from nvidia.com
- AMD Radeon: AMD Software Adrenalin Edition marked WHQL Recommended
- Intel Arc: the WHQL certified Game On driver from intel.com
Don’t judge the driver by its version number
A Studio or Pro package can carry a newer version number than the Game Ready release sitting next to it and still be missing the game fixes that release ships with. The version number tells you when it was built, not what it supports, so check the branch name, not the number, before you download.
The Manage 3D Settings Pass
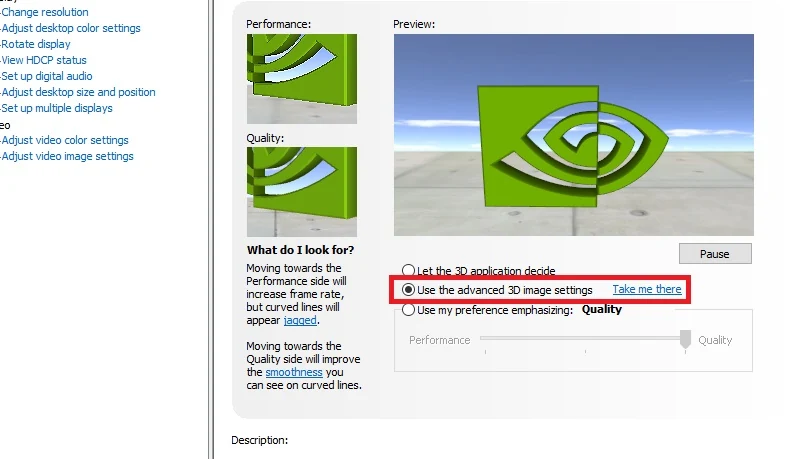
Every toggle that actually changes how a game runs lives one tab away from the one most people never open. Click Adjust Image Settings With Preview in the 3D Settings tab, pick Use the Advanced 3D Image Settings, and hit Apply, because that’s what unlocks Manage 3D Settings for editing in the first place. Once you’re in there, work down the list, and hit Apply again at the bottom right when you’re done, or none of it saves.
| Image sharpening | On — sharpening 0.50, film grain 0.17 |
| Ambient occlusion | Performance |
| Anisotropic filtering | Application-controlled |
| Antialiasing — FXAA | Off |
| Antialiasing — Gamma correction | On |
| Antialiasing — Mode | Application-controlled |
| Antialiasing — Transparency | Off |
| Background Application Max Frame Rate | Off |
| CUDA – GPUs | All |
| DSR – Factors | Off |
| DSR – Smoothness | Off |
| Low Latency Mode | On |
| Max Frame Rate | Off, or matched to monitor refresh rate |
| MFAA | Off |
| OpenGL Rendering GPU | Your own card, from the dropdown |
| Power Management Mode | Prefer Maximum Performance |
| Shader Cache | On |
| Texture filtering — Anisotropic sample optimization | On |
| Texture filtering — Negative LOD bias | Allow |
| Texture filtering — Quality | High Performance |
| Texture filtering — Trilinear optimization | On |
| Threaded optimization | Auto |
| Triple buffering | Off |
| Virtual Reality pre-rendered frames | 1 |
| Configure Surround, PhysX | PhysX switched from Auto to your GPU model |
Image sharpening is the one setting on this entire list that costs nothing: no frame rate hit, measured or otherwise. That doesn’t mean cranking it does you any favours, since push it too far and the edges you’re trying to pull out of the image start eating the detail they were supposed to clarify. Digital Trends lands on 0.50 with 0.17 film grain as the starting point, and from there it’s a taste call, not a performance one.
Low Latency Mode goes On because of how it changes when a frame gets submitted in the first place: instead of queuing up ahead of time, a frame enters the pipeline only when the GPU is actually ready for it, what Nvidia calls just in time frame scheduling. The result cuts both ways in your favour, lower latency and higher frame rates at once, which is a rare enough combination that there’s no real argument for leaving it Off.
DSR Factors and DSR Smoothness both go Off. The pitch sounds smart, render at a higher resolution internally then downscale for a sharper image, but Digital Trends calls it a killer for frame rates, and DLSS has since taken over the exact job DSR was trying to do without the frame rate penalty attached. There’s no scenario left where DSR is the better tool for the job.
Max Frame Rate is where the right answer depends on who’s asking rather than what the panel defaults to. Leaving it Off is fine, and matching it to your monitor’s refresh rate is fine too, but some competitive players deliberately cap at double their refresh rate instead, chasing lower input latency over a number that matches the screen. The case for capping anything at all comes down to menus: plenty of games run their menu screens completely unlocked, which does nothing but burn GPU power for a static screen nobody needs rendered at 300 frames a second.
Background Application Max Frame Rate stays Off, and there’s no performance cost to leaving it that way. Turn it on only if a minimised game or app is visibly stealing performance from whatever you’re actually using, and when you do, set the lowest number you can tolerate: Digital Trends suggests 60 fps on most machines, 30 fps if the card running it is older or already stretched thin.
Two settings on the list don’t toggle a feature at all, they just point the driver at the right piece of hardware. PhysX sits under its own Configure Surround, PhysX page, and it should be switched from Auto onto your actual GPU model by name rather than left for the driver to guess. OpenGL Rendering GPU works the same way: pick your card from the dropdown, which only matters if there’s more than one GPU in the machine for the driver to choose between.
Don’t close the panel without this
Work down every setting above and it still doesn’t matter if you skip the last step. Apply sits at the bottom right of the panel, and nothing you’ve changed is saved until you click it.
G-Sync vs Vsync: the Guide Contradicts Itself
Two pages, one setting, two different verdicts. G-Sync works by making the monitor refresh only when a frame actually arrives, syncing the panel to the GPU instead of the other way around, which is what kills screen tearing in the first place. The Monitor technology page tells you to turn it on if your display supports it, full stop, no caveats. One thing worth knowing before you go looking for that toggle: it isn’t visible to everyone. If you don’t see a Monitor technology option in your 3D Settings panel, that’s not you doing something wrong, it’s just not there for your setup, and you can move on without it.
Flip to the Set up G-Sync page and the guide changes its mind. There, it calls G-Sync almost obsolete on modern rigs, and it has a reason: pair a powerful card with a high-refresh gaming monitor and G-Sync can actually cost you performance rather than add anything, because the GPU is already feeding frames fast enough that waiting on the panel stops helping. The call is different for anyone still on a budget or mid-range machine that’s a few years old. There, it’s still worth ticking Enable and seeing what it does for you.
| Your setup | G-Sync call |
|---|---|
| Powerful card, high-refresh gaming monitor | Almost obsolete, can lower performance |
| Budget or mid-range PC several years old | Worth trying, tick Enable |
| No Monitor technology option visible | Not available to you, skip it |
Vsync is the easier call, and it only goes one way: leave it off. It caps your frame rate at the monitor’s refresh rate and brings input lag along with it, and G-Sync or FreeSync will fix tearing far better than Vsync ever will. The only time to reach for it is when tearing is bad and you don’t have G-Sync or FreeSync available at all.
The Display Tab: Resolution, Colour and RTX VSR
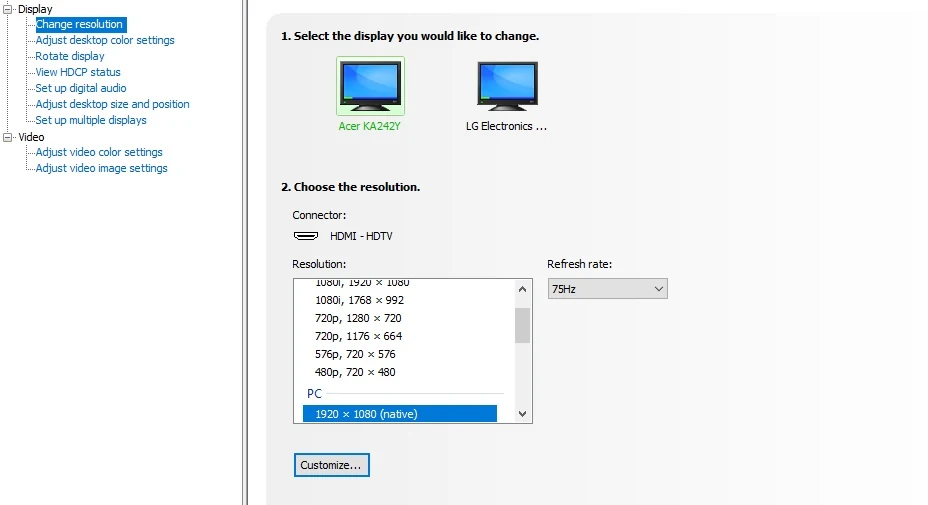
The Change Resolution page is the fastest fix in the whole Control Panel, and it costs nothing in frame rate to get right. Pick the highest resolution available in the PC list, then push the refresh rate dropdown to the highest number your monitor actually offers, because leaving either one on a stale default just leaves performance you already paid for sitting unused. Tick Use Nvidia Color Settings on this same page, set the desktop colour depth to Highest (32-bit), and set Output Dynamic Range to Full: skip that pair and limited range crushes your blacks and clips the top of your highlights before a single game pixel hits the screen. Run through all of it for every display you’ve got plugged in, not just the main one, since the panel treats each monitor as its own separate object with its own settings.
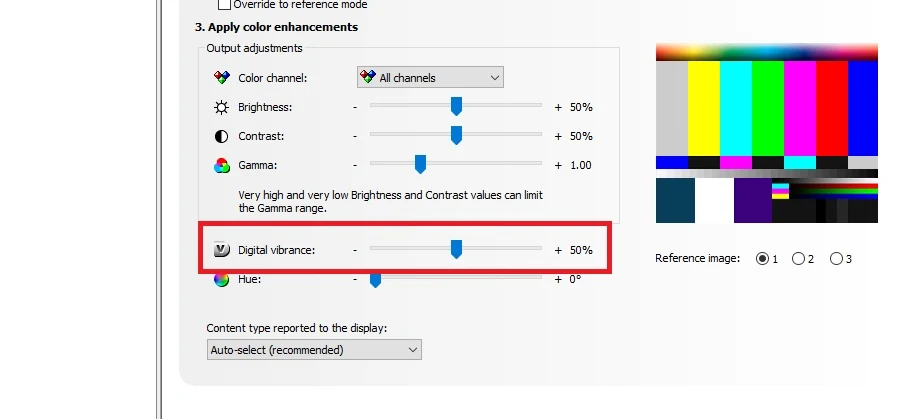
Everything on the Desktop Color Settings page past this point is taste, not performance, and nothing you touch here costs a frame. Digital Vibrance is the one worth touching: it raises colour saturation and brightens shades, and Digital Trends points at 70% to 80% as the range that tends to look best, though how far into that range looks right depends on the game you’re running. Brightness, contrast and gamma are yours to set by eye, and if anything you change looks worse than the default, the sliders are trivial to put back where they started.
Scaling: Three Modes, Three Jobs
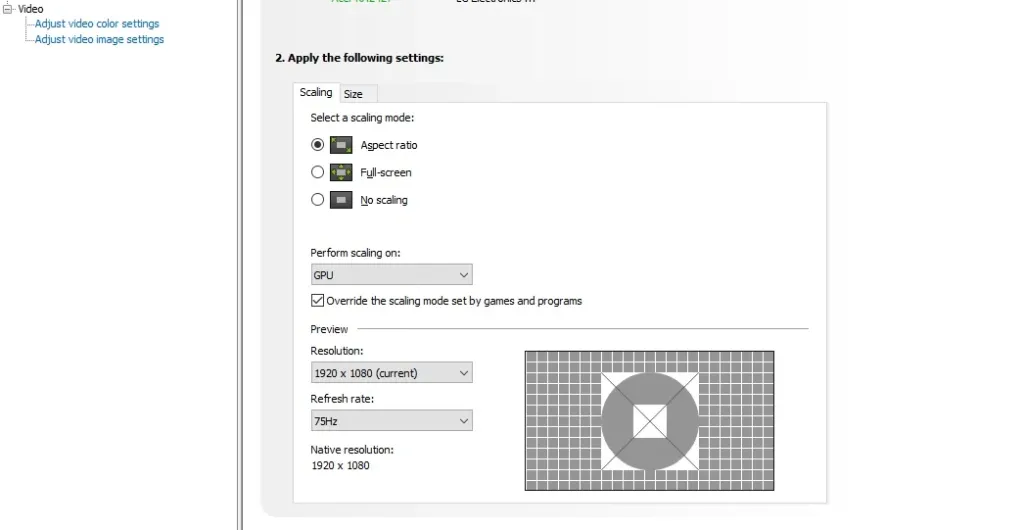
- No Scaling hands over the most fps at native resolution, and that’s the right call if your game is already running at the resolution your monitor is set to.
- Aspect Ratio gives the best mix of performance and visuals for anything running below native, but it only becomes available once GPU scaling is switched on back in the 3D Settings tab.
- Integer Scaling is built for low-resolution and pixel-art games, where it keeps every pixel a clean multiple instead of smearing detail across extra screen space.
- Whichever mode you pick, set the dropdown so scaling is performed on the GPU rather than the display.
- Tick Override the Scaling Mode Set By Games and Programs, or a game can ignore the choice you just made and fall back to its own.
The video colour page is a separate settings block from the desktop one, and it has its own range problem to fix on its own. Choose Nvidia Settings for colour adjustment, switch to the Advanced tab underneath, pick Full (0-255) and hit Apply: it’s the same limited-versus-full range issue as the desktop side, just living on a different page and easy to miss if you only fixed the first one.
Pages Not Worth Opening
Rotate Display, View HDCP Status and Set Up Digital Audio do nothing for gaming. Skip all three; there’s nothing in any of them worth adjusting.
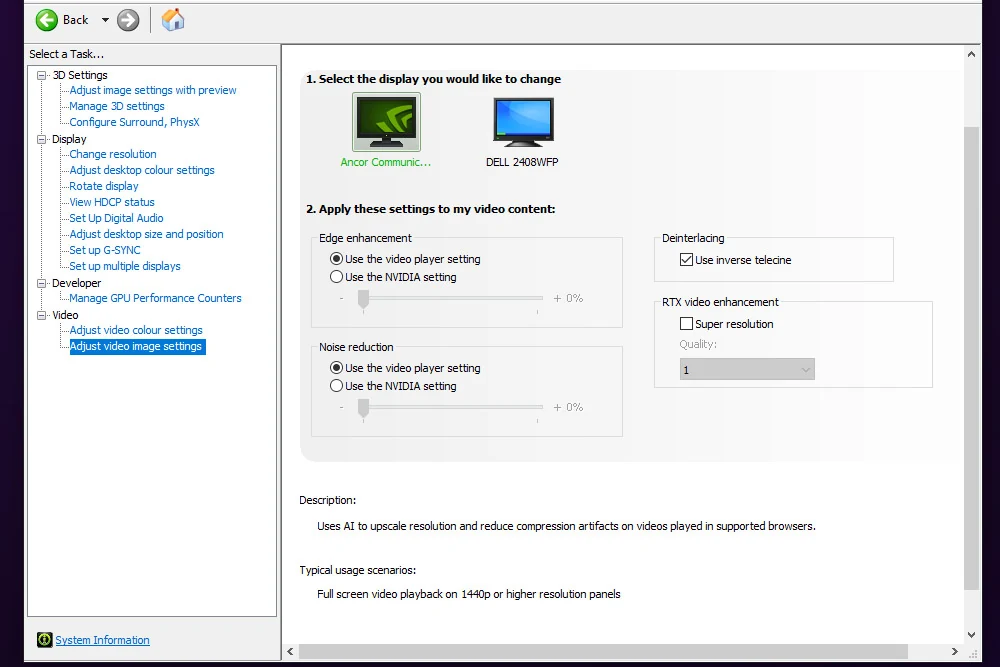
RTX Video Super Resolution is the one Display-side feature tied to specific silicon rather than a setting that works on every card. It sits under RTX video enhancement on the video image settings page and runs on the card’s Tensor cores to upscale online video, sharpening lower-resolution footage as it plays. Support right now covers RTX 30-series and RTX 40-series cards only, with RTX 20-series support possibly arriving later, which puts a 3060 Ti on the list of cards that can already use it. Digital Trends calls it not a game-changing setting, and that’s about the right scale to judge it on: the payoff shows up in web video, not in a game.
Restart the machine once you’re done, since that’s what locks every one of these changes in rather than leaving them half-applied. Load a game afterward and check it runs stable, and if any setting made things worse instead of better, the panel is right there to walk it back.
Tracing Driver CPU Time: Arc B580 vs RX 6900XT
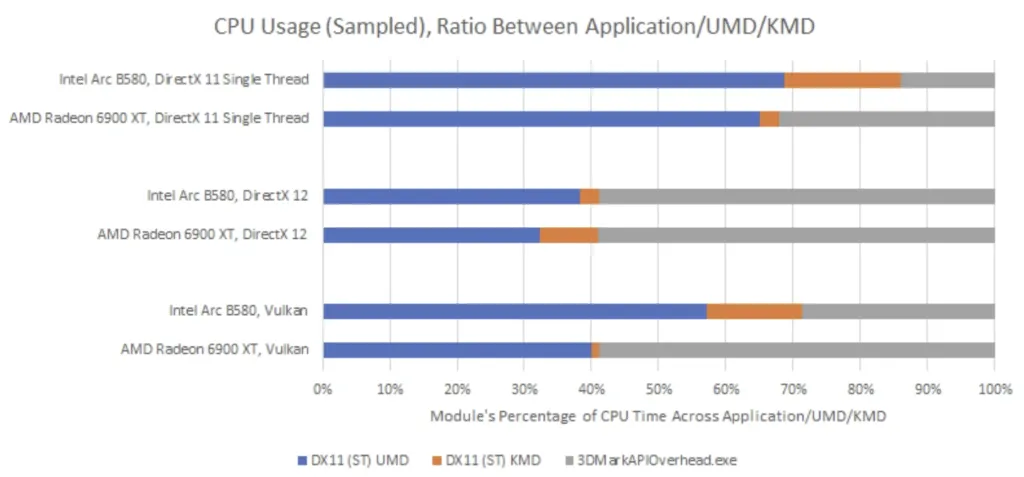
Hardware Canucks ran the B580 through two very different CPUs and got two very different cards. Pair it with a Ryzen 7 9800X3D and it trades blows with the RTX 4060. Drop it onto an Intel Core i5-9600K instead and it falls well behind that same rival, nothing about the GPU changed, only the CPU doing the talking to it. Hardware Canucks pointed at Intel’s drivers as the reason, which is exactly the kind of claim that needs someone to go open the hood, so Chips and Cheese went looking for where all that CPU time was actually going.
Every graphics driver splits into two halves. The user-mode driver runs inside the game’s own process, which means if it trips over something, the damage stays contained to that one application instead of taking the whole system with it. The kernel-mode driver is the half that actually talks to the GPU hardware, Intel’s version is a file called igdkmdnd64.sys, AMD’s is amdkmdag.sys, and by design most of the heavy lifting is supposed to happen in user mode, not down in the kernel.
The tool for finding overhead is 3DMark’s API overhead test, which fires an enormous number of simple draw calls and keeps raising the count until frame rate drops below 30 FPS. Futuremark has since deprecated it, saying draw call count stopped being the thing that decides how an API performs in real games. That doesn’t make it useless here, it exaggerates software-side bottlenecks on purpose, which is precisely what you want when you’re trying to see a driver’s overhead rather than a game’s.
- Intel burns more CPU time than AMD in both halves of the driver
- Vulkan shows the widest gap between the two cards
- Intel spends far longer in interrupt service routines under DirectX 11
- Intel spends far longer in interrupt service routines under Vulkan too
- Under DirectX 12, Intel’s driver actually does well on interrupt time
- AMD processes draw calls nearly 5 times faster than Intel
| Behaviour | Arc B580 | RX 6900XT |
|---|---|---|
| DX11 CPU-side submissions per frame | Dozens of queue packets | One submission per frame |
| DMA packet size, DX11 | Around 4 KB | 64 bytes |
| DMA packet size, Vulkan | Around 4 KB | 64 bytes |
| Paging packets on the copy queue | 64 KB and sometimes 576 KB blocks | None observed |
| Heavier DX12 packet execution time | Nearly 10x longer | 2.5x longer |
GPUView tells the same story at the level of actual submissions. Under DirectX 11, AMD gets a whole frame out the door with a single submission, Intel needs dozens of queue packets to do the same job. Intel’s DMA packets under both DX11 and Vulkan run around 4 KB a piece, where AMD’s have always stayed at 64 bytes. Stranger still, the B580’s copy queue shows paging packets moving blocks of 64 KB and sometimes 576 KB, each one doing a Transfer Mdl to Memory operation, while the 6900XT’s copy queue never shows a paging packet at all. That’s Intel’s driver paying an extra toll just to get data across to the card that AMD’s driver doesn’t pay.
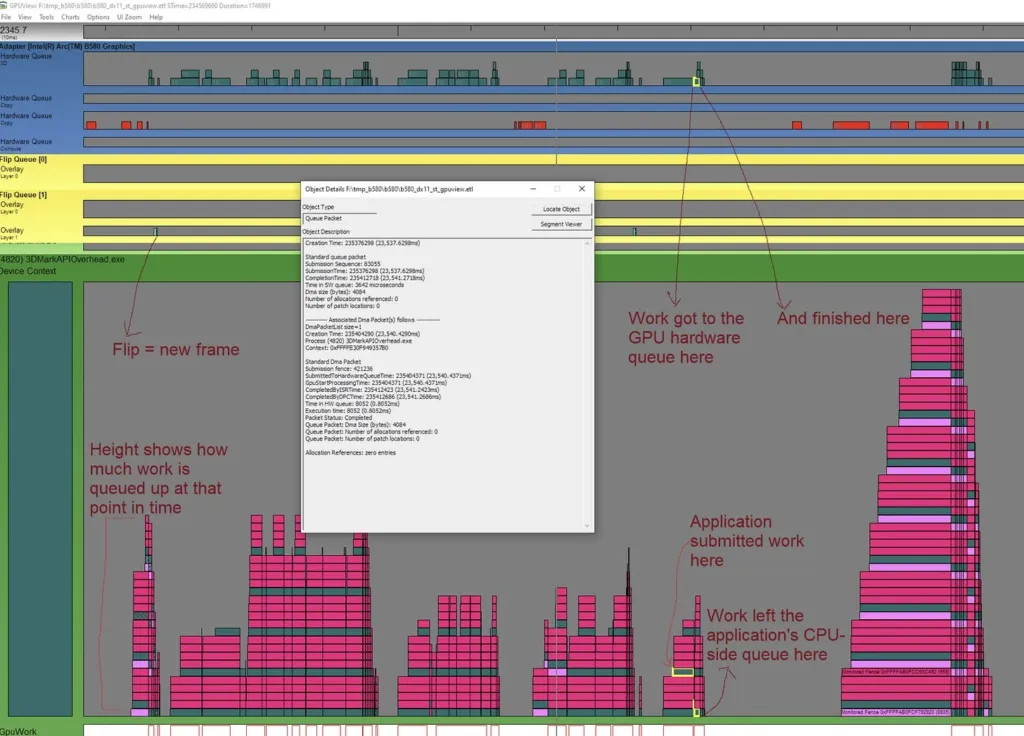
Switch to DirectX 12 and the story flips. Heavier packets cost the 6900XT 2.5x more execution time, the same work costs the B580 nearly 10x more, and on paper that looks like another Intel loss. But both cards almost always had work queued on the 3D queue under DX12, which is what GPU-bound looks like rather than driver-limited, and Intel was only sending about 8 DMA packets per frame against AMD’s over 100. The gap here is the hardware chewing through harder work, not the driver stalling.
One specific stall is worth a hardware engineer’s attention: Intel’s user-mode driver calls Lock2CB inside d3d11.dll to lock an allocation, and that call sits waiting on spin lock acquisition. AMD’s driver doesn’t need to wait for the same thing. It’s a reminder that overhead isn’t always the vendor’s own code running slow, sometimes it’s time spent waiting on a Windows component that isn’t the driver at all.
None of this is invisible to the people actually playing games on these cards. Plenty of them have already landed on threaded optimization as the fix, a setting that spreads driver overhead across several processor cores instead of leaving it all on one.
I turned on threaded optimization in profile inspector to spread the nvidia driver overhead across all my cores and threads to minimize the overhead a bit
Driver overhead isn’t the only explanation on the table, and it’s worth saying so before anyone starts blaming every frame rate gap on a driver trace. Memory bandwidth decides plenty of these outcomes too, especially once resolution climbs.
It’s not always CPU-related. It’s also memory bandwidth-related. Blackwell GPUs have a lot more VRAM bandwidth than Ada and RDNA4 GPUs, which is the reason why they pull ahead at higher resolutions.
Why Intel’s drivers lag here
Chips and Cheese’s read isn’t that Intel is sandbagging old platforms on purpose. Intel has decades of experience writing drivers for low-end integrated GPUs, where framerate targets are low enough that CPU bottlenecks almost never surface and moving data between CPU and GPU is cheap because there’s no PCIe link in the way. AMD and Nvidia have spent those same decades writing drivers for discrete cards instead, where PCIe transfers cost real money and frame rates are high enough to expose every wasted cycle, and their drivers don’t lean on tricks like Resizeable BAR the way a newcomer’s might need to. Call it inexperience with this specific problem rather than neglect of it.
Symptoms That Call for a Full Wipe
A clean install isn’t a diagnosis you run because you’re sure of the answer; it’s one you run because the result tells you where to look next. If wiping the driver out and starting fresh fixes whatever was broken, the driver was the problem the whole time. If it doesn’t, the driver was never the problem, and you’re looking at hardware instead. That’s the entire value of doing it early rather than as a last resort: either way, you walk away knowing something you didn’t before.
- The GPU isn’t detected at all
- Screen resolution is locked to something low like 800×600
- Device Manager shows a hardware error such as Error 43
- GPU performance has dropped for no obvious reason
- A VIDEO_TDR_FAILURE blue screen, which points straight at the GPU driver
- A VIDEO_SCHEDULER_INTERNAL_ERROR blue screen, same story
- Random crashes or instability you want to rule software out of before chasing anything else
- Switching between NVIDIA, AMD and Intel cards in the same system
A Failed Wipe Still Tells You Something
If the symptom survives a clean install, driver corruption is off the table. That 20 minutes wasn’t wasted; it just handed you a narrower problem to solve, and the answer now points at the hardware itself rather than anything NVIDIA shipped.
Not everyone who’s hit these symptoms reached for a wipe. For some, the fix wasn’t removing the driver, it was going back to the one before it, on the theory that the newest release was the thing causing the trouble in the first place.
culprit is the new drivers from nvidia. need to downgrade to 610.88 no more crashes or blackscreen
The Clean Install, the Panel Pass, Driver Overhead
Of everything covered here, wiping the driver and reinstalling clean is the only step that actually tells you something you didn’t know before you ran it. It separates a software fault from a hardware one with no ambiguity left over: fix the problem and the driver was guilty, don’t fix it and you’re now looking at the card, the power supply, or the slot it’s seated in instead of chasing settings that were never going to matter. 20 minutes for an answer that specific is a good trade by any measure.
Everything in the Nvidia Control Panel sits well below that on the value scale. Image sharpening costs nothing in frame rate and buys real crispness, with 0.50 sharpening and 0.17 film grain as the starting point most people land on, though push it past that and detail starts dissolving instead of popping. Prefer Maximum Performance works the opposite trade: you get more frames, but the card runs hotter and draws more power to get there, and that’s a bill you pay every session rather than the free lunch sharpening gives you.
Pros
- A clean install either fixes the fault outright or proves it’s hardware, which is a useful answer either way
- Image sharpening adds real crispness with no cost to frame rate
Cons
- Prefer Maximum Performance buys extra frames by letting the card run hotter and draw more power
- Oversharpening past the usual 0.50 starting point loses detail instead of adding it
- Driver overhead lives in vendor code nobody outside Intel can touch
Driver Overhead and Vendor Code
Chips and Cheese traced Intel’s overhead as far as it could and still came up without a single cause, landing instead on a combination: more processing happening inside the driver itself, plus the B580 handling certain commands less efficiently once they’re issued. Every fix it named, from digging into driver CPU time to changing how work gets batched into DMA packets, is something Intel’s own engineers would have to do inside the driver’s source code. There’s no checkbox for that in the control panel, and there never will be; it’s the one item on this list that isn’t yours to fix.
- Nvidia and AMD have spent decades optimising discrete drivers for high frame rates over slow PCIe links, so their cards keep working on weaker systems without needing Resizable BAR to make up the difference
- Intel’s driver experience runs just as deep, but mostly on integrated graphics, where moving data between CPU and GPU memory is cheap and the frame rate targets are low enough that CPU-side bottlenecks never get the chance to show up
- Those bottlenecks only surface once frame rates climb high enough to expose them, which is exactly the range a discrete card like the B580 is built to run in
Chips and Cheese isn’t shy about calling the midrange GPU market an unattractive dumpster fire over the past few years, which is the context the B580 needs to be read against: it undercuts the RTX 4060 on price while carrying more VRAM. Paired with a Ryzen 7 9800X3D it competes with that RTX 4060 directly; paired with an i5-9600K it falls well behind. A cheaper card reaching acceptable performance is good news for anyone shopping this year, but only if the CPU behind it isn’t the thing holding it back.
Where To Spend Your Time
Run the clean install first, because it either fixes the fault or tells you it’s hardware, and nothing else on this list gives you that kind of answer. Sharpening is free crispness worth grabbing while you’re in there. Driver overhead isn’t a setting at all, it’s Intel’s code to fix, not yours.